
Basic CMS Edits
Target Audience: Teachers and administrators who have completed CMS training.
For programs whose editing needs extend beyond what can be completed in the Learning Management System (LMS), specialized Content Management System (CMS) training is available. CMS editing access should be limited to a small group of qualified individuals, such as curriculum specialists or designated instructional leaders. These users should be responsible for course-level content decisions and ongoing content management.
Note: This article is not a step-by-step guide for accessing or editing the CMS. It is intended for users who have completed the required training and received CMS credentials.
Locate the GUID
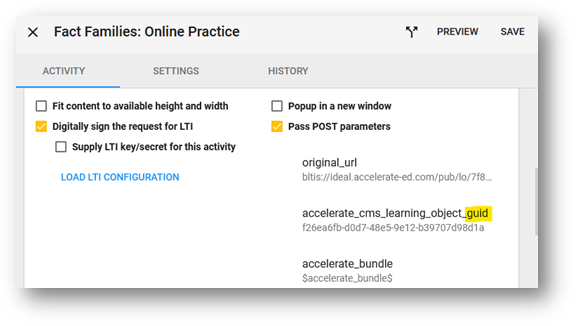
In Buzz
- Open the lesson editor for the lesson you want to edit.
- Under the Activity tab, locate the GUID.
- Copy the value from the GUID field.
- Leave this window open so you can replace the GUID later in the process.
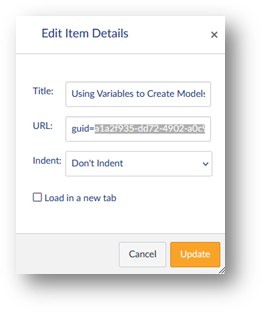
In Canvas
- Select Edit from the ellipsis menu for the lesson.
- Locate the GUID in the URL field.
- Copy all characters that appear after
guid=. - Scroll to the right if necessary to ensure all characters are copied.
- Leave this window open so you can replace the GUID later.
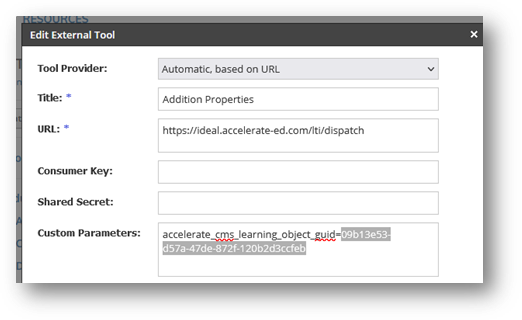
In Schoology
- Select Edit from the gear menu for the lesson.
- Locate the GUID in the Custom Parameters field.
- Copy all characters that appear after
guid=. - Leave this window open so you can replace the GUID later.
Reorder Lesson Pages
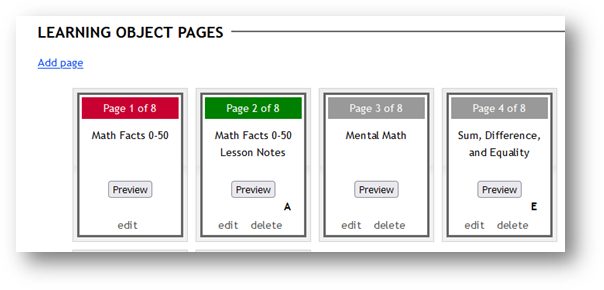
- In the cloned lesson, scroll to Learning Object Pages near the bottom of the page.
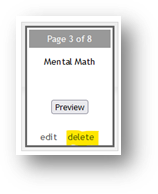
- Select and drag the page bar (for example, Page 3 of 8) to the desired location.
- Click Save Current Page Order when finished.
Remove a Lesson Page
- Scroll to Learning Object Pages.
- Locate the page you want to remove.
- Select Delete in the lower-right corner of the page.
Edit Text on a Lesson Page
- In Learning Object Pages, select the page you want to edit.
- Click Edit in the lower-left corner.
- In the Page Content Items section, select Edit This Item within the HTML item box.
- Make the necessary text changes in the HTML editor.
- Select Update to save your changes.
Upload an Image
Images cannot be inserted directly into the CMS and require a URL.
Use an Existing Course Image
- Right-click the image.
- Select Copy Image Address, or
- Open the image in a new tab and copy the URL from the address bar.
Upload a New Image
Important: Resize the image before uploading.
- In Page Content Items, select Add Content Item.
- Choose Image from the upload options.
- Browse to the image location on your computer.
- Upload the image.
- After the image appears below the HTML editor, copy its URL by:
- Selecting Copy Image Address, or
- Opening the image in a new tab and copying the URL.
- Return to the main HTML editor and select Edit This Item.
- Place the cursor where you want the image to appear.
- Select the Insert Image icon.
- Paste the image URL.The
http://prefix is already present. Do not add it again. - Select Update to save.
- Delete the temporary image that was uploaded solely to generate the URL.
Insert or Replace a Video
The video must be hosted online (for example, YouTube).
- Open the video.
- Select Share.
- Choose Embed.
- Copy the embed code or link provided.
- Return to the CMS HTML editor and select Edit This Item.
- Place the cursor where the video should appear.
- Select the Embed icon on the far right of the editor toolbar.
- Paste the copied embed code or link.
- Select Update to save.
- If replacing an existing video, delete the original video.
Replace the Original GUID
After all edits are complete, the lesson has been previewed, and the cloned lesson has been published:
- Under Learning Object Attributes, copy the value listed beneath the ID heading. This is the new GUID.
- Return to the LMS window you left open earlier.
- Delete the original GUID and paste the new GUID.
- Save the change:
- Buzz: Select Done
- Canvas: Select Update
- Schoology: Select Save Changes