Canvas Gradebook
Target Audience: Teachers (Canvas)

Grading is a key task for teachers on all platforms. This article explains how to access and use the gradebook on the Canvas platform.
Accessing the Canvas Gradebook
- Select the desired course from the Teacher Dashboard in Canvas.
- Choose Grades from the column on the left side of the screen as shown here:

Using the Canvas Gradebook
Key features to know:
- Gradebook Menu: This drop-down menu offers a view of Gradebook History as well as the choice between Traditional or Individual Gradebook. Views.

- Search Fields: Teachers can search by student name or assignment name to quickly find needed information.
- Keyboard Icon: Selecting this icon provides a helpful view of available keyboard shortcuts.

- Import/Export: Teachers can import a .csv file or use the export options to download the entire gradebook or the current gradebook view.

- Gear Icon: Selecting the gear icon opens a menu to select several additional settings including late policies, grade posting policies, and view options. In View Options, teachers can choose how to arrange the gradebook, which items to show in the gradebook, and set status colors for the gradebook.


- Student Names: Selecting an individual student name from the gradebook brings up the side panel overview of grades for that student as well as last login date, and an option to send a message to the student.

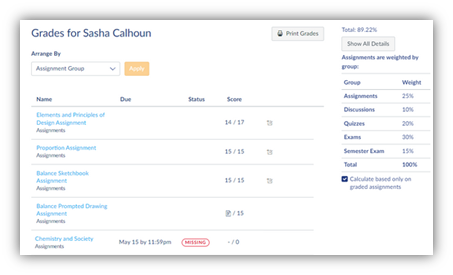
- Selecting Grades from the side panel above will show the teacher a full view of the grades for that student. Some key features of this view:
- Arrange By: This field allows teachers to sort the assignments by due date, assignment group, module, and name.
- Print Grades: This button arranges the data in a printer-friendly manner to be shared with students and learning coaches as needed.
- Weighting: On the right side of this view, teachers will see the weighting for the course being viewed. Accelerate Education courses are weighted by groups. The option to calculate the total based on only graded assignments should be checked in most cases.
- Assignment List: This area shows the assignment names, due dates (if set), assignment status such as late or missing, the score if graded, or a paper icon if the student has submitted work, but it’s not yet graded.

- Totals area: This area shows a breakdown of how the student has performed in each category as well as a total score.

- Select Grades from the navigation menu at the top of the screen to return to the traditional gradebook view.

- By default, the Total column is listed at the end of the gradebook. To move it to the beginning, scroll all the way to the right to find the Total column. Select the ellipsis menu that appears when you hover over the upper right of the Total column and select Move to Front.
- Teachers may also wish to add a Notes column to the gradebook to track information such as preferred name, IEP needs, Learning Coach name, and more. To add this column, select the Gear icon, then select the View Options tab. Select Notes from the Show list that appears. Select Apply Settings. This Notes column is added to the beginning of the Gradebook just after the Total column, if you’ve moved it to the front.

