Adding Content Via the IDEAL Library
Target Audience: All

Our courses can be modified in multiple ways to meet program needs. This article focuses on adding content from the IDEAL Learning Library to a course hosted in the Buzz LMS. Adding this content may be done to meet district curriculum needs, provide remediation for struggling students, or add rigor for advanced students. Additionally, teachers may choose to add content for the whole class, or they may add it for an individual/group within a class. Both processes will be covered here.
Best Practice: Try to make most course edits prior to students starting. Making edits after students start may impact student calendars and pacing and performance data.
Adding Content for the Whole Class
- Plan ahead to know which activity you wish to add and where you want to add it. Users may choose to add entire modules, entire lessons, or assignments/assessments from the library.
- Select the course pencil icon (editor) from the teacher’s homepage.
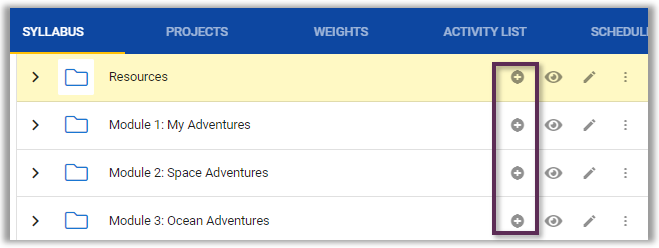
- Select the + associated with the content module (if adding content or graded activity to an existing module).
- Select “Library” from the table that appears as seen below:

- Select IDEAL Learning Library from the window that appears. Now, a list of alphabetized courses appears.
- Scroll to the desired course and select Open. All modules from the course are listed here.
- Select Add to add an entire module OR Open to open a module and view its lessons. When you select Open, each activity from the module is listed with the option to:
- Select Preview if you want to view the lesson to verify it’s the correct one.
- Select Add if you’re ready to add the lesson to your cart.
Note: There is no additional fee for adding these lessons.
- Select the Remove button to take an item out of your cart if the wrong one was selected.
- Repeat this process as needed, and then select View Cart. The item(s) selected will appear with the options to Preview and Remove. Additionally, notice that you now have Link and Copy buttons as well.
- Select Link if you don’t plan to make any changes to the content. This keeps the link between your course and Accelerate Education, ensuring that all updates flow to the lesson.
- Select Copy if you plan to edit the item. This will typically be done for assessments and assignments. Note that a copy does not receive updates from Accelerate Education.
- Drag the newly-added item to where you want students to see it. By default, if added to an existing module, it will appear at the end of the activity list for that module.
The process is basically the same when adding a completely new module. The only difference is that you start by selecting the + Activity option below the last module and add a folder first. This folder becomes the container for the new module.

Adding IDEAL Content for a Group
Teachers may wish to assign additional content to individual students or small groups of students in a class for remediation, enrichment, or other reasons. In this case, teachers should first create groups following the process outlined here: Creating Groups.
- Add the desired content to the course as outlined for the whole course.
- Select the eye icon for the new content to hide it from the whole course.
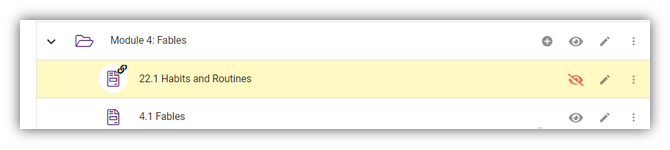
- Select the pencil icon for the new content.
- Navigate to Settings.
- Select the group you wish to see the new content from the People icon in the upper right.
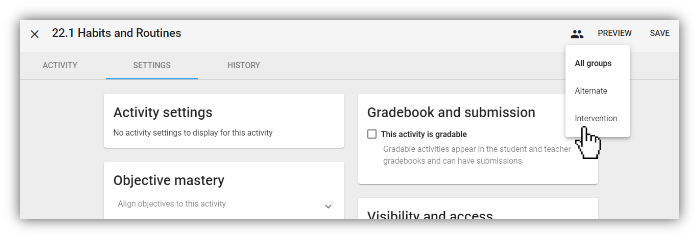
- Select the Visibility and access menu (which now applies only to the selected group), and update the visibility to Students, teachers, and observers.
- Select Save.